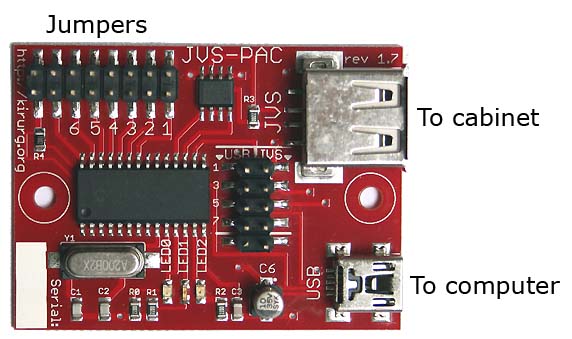
JVS-PAC installation
First time use
- Make sure your cabinet is correctly set up for JVS. If you can play Naomi games, you're good to go.
- Connect the JVS-PAC to yourcabinet. Use the "USB" cable that normally goes to your Naomi motherboard, and connect it to the connector marked "JVS".
- Power up your cabinet
- Connect the JVS-PAC to your computer with a USB cable.
Mac OS X users
If you're using OS X and the keyboard (MAME) edition, you need to put a jumper on JP3. The reason is that OS X and Windows/Linux process SHIFT/ALT/CTRL differently. Withouth JP3, simultaneous button presses will not work properly under OS X.You need firmware version 0.7 or later for OS X.
Do not enable this when using Windows/Linux - it will cause problems with simultaneous button presses.
Advanced optional -Firmware upgrade
- Download firmware update program and device driver from this site
- Disconnect JVS-PAC from computer
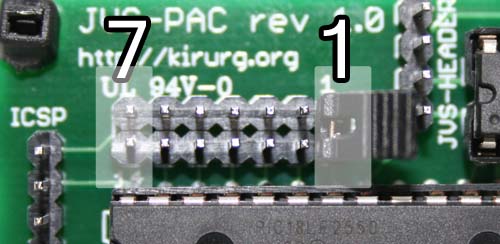
- Install a jumper on JP1, and reconnect to a PC running Windows.
- If this is the first time doing a firmware upgrade, only LED0 will blink while windows is searching for a driver.
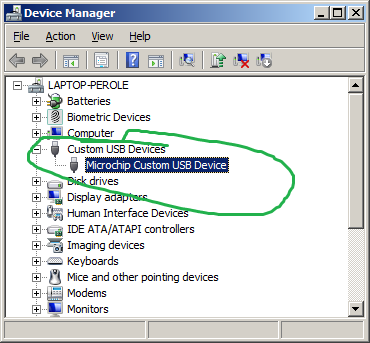
- When driver is successfully installed LED0 and LED1 will blink alternately. You will find it under 'Custom USB Devices' in device manager. You are now ready to upgrade the firmware.
- First choose "PICDEM FS USB board", this is the JVS-PAC
- Load the firmware image by clicking "Load HEX File" and navigate to the downloaded JVS-PAC firmware
- Press the program device button, LED2 will light up while upgrade is in progress. This step should take about 4 seconds.
- When update is completed, disconnect JVS-PAC from computer and remove jumper
If device driver installation is unsuccessful, look for an ‘Unknown Device’ under 'Other devices' in Device Manager. The hardware ID is VID_0FDD / PID_000B. Simply choose update Driver, and navigate to the one downloaded.

it is not possible to "brick" the jvs-pac using this program, even if you press the Erase Device button.
If you get the message "USB Read Failed. Failed with error 6: the handle is invalid." or "USB Write Failed. Failed with error 997: OVerlapped I/O operation is in progress." - restart your computer and/or change USB port.
Advanced optional - Disabling shift key functionality
If you don't want or like the shift key functionality, you can set a jumper on JP2. Be aware that the MAME license does NOT permit operation in a commercial setting.
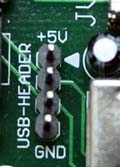
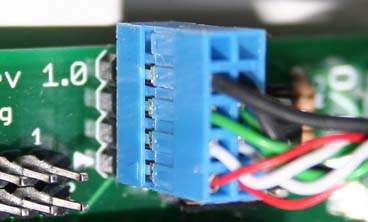
Advanced optional - Using the USB header on rev 1.6 boards
With rev 1.6 boards, you can plug a USB bracket directly onto the PCB and use a Male-Male USB type A cable. Pins 1,3,5, 7 are 5v, USB-, USB+ and GND.
Advanced optional - Using the
USB header, rev 1.0 and rev 1.5 boards
If you embed the JVS-PAC inside a computer case, you may want to use
the header instead of the connector. You will need a 0.1" pitch
female-female cable. Pin1 is 5V and marked with a triangle on the
JVS-PAC. Align the cable so that 5V connects to 5V and GND to GND.

you can't find the right cable, but still would like to keep the JVS-PAC inside a computer - you can also use a USB bracket and a standard cable between the bracket and the JVS-PAC.
Advanced optional -Using The
JVS header
A standard USB bracket can be used with the JVS header. Make sure that
pin1 (red cable) is connected to the pin marked with a triangle on the
JVS-PAC. On rev 1.6 boards, there is only one way to fit the connector.
You can now connect your cabinet to the USB bracket instead of directly to the JVS-PAC.
Verified I/O Boards
As more people use this device, the list will get longer. In theory, it will work with any JVS compliant I/O controller, but the ones below are confirmed working without issues:| Vendor | Model | found in | notes/links |
| Sega | 837-13551 Ver1.00 | Naomi Universal cab | The normal version (no jamma connector) |
| Sega | 837-14572 Ver1.00 | Lindbergh Univeral cab | Image |
| Sega | 838-13683D Ver1.09 | Naomi kits | JAMMA edge connector image |
| Sega | 838-13683B Ver1.07 | ? | JAMMA edge connector image |
| Konami | Windy2 I/O Ver 1.0 | Konami Windy II cab | |
| Taito | JVS/AMP PCB Ver2.00 | Taito X2 kits | image |
| Taito | JVS PCB Ver2.00 | Taito Vewlix cab | Image |
| Namco | I/O CYBER LEAD Ver2.02 JPNLED-0100 | Namco Cyber Lead cab | |
| Capcom | Capcom JAMMA I/O | not supported as of 0.6 (but reported working) - contact me.. | |
| Unknown | Unknown/unmarked | Vewlix Clones |
Not supported as of 0.8 |
page was last modified: December 02 2015 06:53 UTC